Vuetifyで休日を登録するためのコンポーネントを作成する
業務システムの開発では「営業日」を計算するために企業の休日を登録する機能が必要になることがあります。
Vuetifyのv-calendarを使って休日を登録するコンポーネントを開発していきます。
v-calendar以外にv-date-pickerも選択肢として考えられますが、今回はslotが豊富に用意されているv-calendarを利用します。
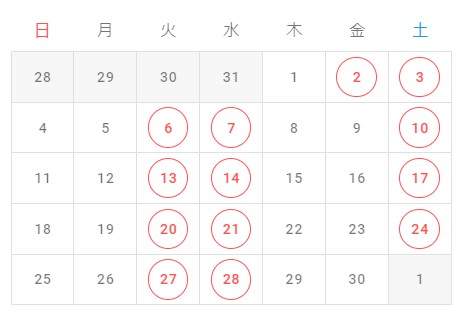
- 指定した年月のカレンダーが表示される
- 日付を選択すると休日として設定される
- 曜日を選択すると対象の日付がすべて休日として設定される
完成イメージ

MyCalendar.vue
<template>
  <div>
    <div class="d-flex justify-space-around">
      <v-btn
        v-for="w in week"
        :key="w.value"
        :color="w.color"
        icon
        @click="clickWeek(w.value)"
        >{{ w.label }}</v-btn
      >
    </div>
    <v-calendar hide-header v-model="focus">
      <template #day-label="{ date, day }">
        <v-btn
          icon
          :color="isHoliday(date) ? 'error' : ''"
          :outlined="isHoliday(date)"
          @click="clickDate(date)"
          class="mb-1"
          >{{day}}
        </v-btn>
      </template>
    </v-calendar>
  </div>
</template>

<script>
function formatDate(dt) {
  var y = dt.getFullYear();
  var m = ("00" + (dt.getMonth() + 1)).slice(-2);
  var d = ("00" + dt.getDate()).slice(-2);
  return y + "-" + m + "-" + d;
}

export default {
  name: "MyCalendar",
  props: {
    year: { type: Number },
    month: { type: Number },
    value: { type: Array },
  },
  data: () => ({
    week: [
      { value: 0, label: "日", color: "error" },
      { value: 1, label: "月", color: "" },
      { value: 2, label: "火", color: "" },
      { value: 3, label: "水", color: "" },
      { value: 4, label: "木", color: "" },
      { value: 5, label: "金", color: "" },
      { value: 6, label: "土", color: "info" },
    ],
    focus: null,
  }),
  created() {
    this.setFocus();
  },
  computed: {
    holidays: {
      get() {
        return this.value;
      },
      set(newValue) {
        this.$emit("input", newValue);
      },
    },
  },
  watch: {
    year() {
      this.setFocus();
    },
    month() {
      this.setFocus();
    },
  },
  methods: {
    setFocus() {
      this.focus = new Date(
        this.year ?? new Date().getFullYear(),
        this.month ? this.month - 1 : new Date().getMonth(),
        1
      );
    },
    clickWeek(weekValue) {
      // 表示月で指定曜日の最初の日付を計算
      let diff = weekValue - this.focus.getDay();
      const startDay = new Date(
        this.focus.getFullYear(),
        this.focus.getMonth(),
        this.focus.getDate() + (diff < 0 ? diff + 7 : diff)
      );

      // 7日ずつ加算しながら祝日データとして追加
      // 表示月を超えたら処理終了
      while (startDay.getMonth() === this.focus.getMonth()) {
        if (this.holidays.some((x) => x === formatDate(startDay)) === false) {
          this.holidays.push(formatDate(startDay));
        }

        startDay.setDate(startDay.getDate() + 7);
      }
    },
    clickDate(date) {
      const index = this.holidays.indexOf(date);

      if (index === -1) {
        this.holidays.push(date);
      } else {
        this.holidays.splice(index, 1);
      }
    },
    isHoliday(date) {
      return this.holidays.some((x) => x === date);
    },
  },
};
</script>
日付を表示する部分はv-calendarを使用しています。
曜日の部分もv-calendarの機能を使えればよかったのですが、残念ながら曜日をクリックするためのイベントは用意されていません。
今回はv-calendarのヘッダは非表示(hide-header)にして、v-calendarの上部にボタンを均等に配置(d-flex justify-space-around)しています。
v-calendarに用意されている日付スロット(day-label)を使って日付部分をカスタマイズしています。
休日になっている日付かどうかを判定して、色と囲み(outlined)を設定しています。
<template>
  <div>
    <div class="d-flex justify-space-around">
      <v-btn
        v-for="w in week"
        :key="w.value"
        :color="w.color"
        icon
        @click="clickWeek(w.value)"
        >{{ w.label }}</v-btn
      >
    </div>
    <v-calendar hide-header v-model="focus">
      <template #day-label="{ date, day }">
        <v-btn
          icon
          :color="isHoliday(date) ? 'error' : ''"
          :outlined="isHoliday(date)"
          @click="clickDate(date)"
          class="mb-1"
          >{{day}}
        </v-btn>
      </template>
    </v-calendar>
  </div>
</template>
表示するカレンダーの年月を指定できるようにしています。
何も指定されなかった場合は現在日付のカレンダーを表示します。
親側でプロパティを変更した場合にカレンダーも切り替えられるようにwatchでyearとmonthを監視しています。
...

  props: {
    year: { type: Number },
    month: { type: Number },
...
  },
  data: () => ({
...
    focus: null,
  }),
  created() {
    this.setFocus();
  },
...
  watch: {
    year() {
      this.setFocus();
    },
    month() {
      this.setFocus();
    },
  },
  methods: {
    setFocus() {
      this.focus = new Date(
        this.year ?? new Date().getFullYear(),
        this.month ? this.month - 1 : new Date().getMonth(),
        1
      );
    },
...
休日として選択された日付を配列で格納します。
親からはv-modelを通して結果をやり取りするためにpropsはvalueという名前で受け取っています。
コンポーネント内でも値を取得、設定できるようにcomputedでアクセスできるようにしています。
...
  props: {
...
    value: { type: Array },
  },
...
  computed: {
    holidays: {
      get() {
        return this.value;
      },
      set(newValue) {
        this.$emit("input", newValue);
      },
    },
  },
...
日付が選択された時のメソッドです。
休日として設定された日付を格納しているholidaysの中に処理対象の日付があるか検索します。
該当する日付があれば休日を解除するので、holidaysから削除(splice)します。
該当する日付がなければ休日として設定するので、holidaysに追加(push)します。
    clickDate(date) {
      const index = this.holidays.indexOf(date);

      if (index === -1) {
        this.holidays.push(date);
      } else {
        this.holidays.splice(index, 1);
      }
    },
曜日が選択された時のメソッドです。
選択された曜日と表示している月の1日の曜日の差分を取得し、選択された曜日の最初の日付を計算しています。
曜日の最初の日付がわかれば、7日加算しながら休日としてデータを格納していきます。
7日加算して翌月になったら処理終了です。
    clickWeek(weekValue) {
      // 表示月で指定曜日の最初の日付を計算
      let diff = weekValue - this.focus.getDay();
      const startDay = new Date(
        this.focus.getFullYear(),
        this.focus.getMonth(),
        this.focus.getDate() + (diff < 0 ? diff + 7 : diff)
      );

      // 7日ずつ加算しながら祝日データとして追加
      // 表示月を超えたら処理終了
      while (startDay.getMonth() === this.focus.getMonth()) {
        if (this.holidays.some((x) => x === formatDate(startDay)) === false) {
          this.holidays.push(formatDate(startDay));
        }

        startDay.setDate(startDay.getDate() + 7);
      }
    },
基本的な日付の処理部分はv-calendarがよろしく処理してくれているので、休日に関する処理だけの実装で済みました。
一応v-date-pickerをベースとしても作成できそうです。
v-date-pickerにはmultipleというプロパティがもともと用意されているので、そのまま配列を渡してあげればOKです。
ただし、月曜日始まりのカレンダーにしたい等、細かな変更はv-calendarの方が楽にできそうです。
以上